Tuesday, November 15, 2011

Oreo Turkey Cookies

I really love baking and creating fun and delicious desserts and I really enjoy making neat creations for my kids. This week I signed up to bring cookies for my three-year-old son’s Thanksgiving feast at school. I was excited because I had several ideas from Pinterest (duh!), including Turkey Sugar Cookies, Pilgrim Hat Cookies, and the winner – Oreo Turkey Cookies.

Oreo Turkey Cookies (12)

Sara, from Our Best Bites, made it really easy for me and laid out a great tutorial on how to make these super cute cookies! The items you need are:

  • Double Stuff Oreo Cookies
  • Candy Corn
  • Reese’s Peanut Butter Cups
  • Whoppers
  • Chocolate Frosting (I used the squeeze tube)
  • Yellow Decorator Icing Tube (Squeeze tube again)
  • Sprinkles

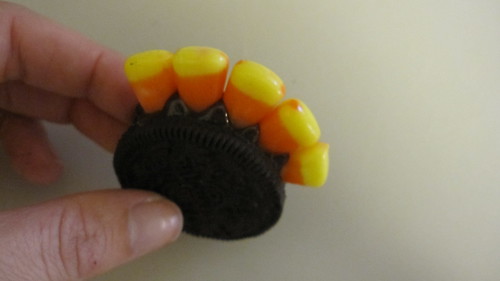
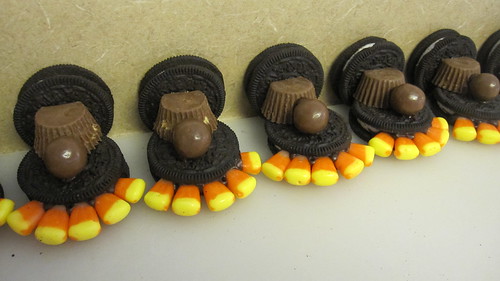
First of all, don’t be tempted to eat that broken Oreo you find in the package. You will need it to make all the turkey cookies. Unless there are two broken Oreo’s – then feel free to eat them both! There were 30 cookies in my package of Oreos, so that equals 15 completed cookies. Take an Oreo and squeeze and line of chocolate frosting into the opening about 1-1/2 inches (or so) long. This is the glue to help hold the candy corns.

Oreo Turkey Cookies (1)

Wedge five candy corn candies into the chocolate frosting in the Oreo. It is probably best to go ahead and do the chocolate frosting and candy corn for all the cookies now – that would be 15 Oreos (unless you ate some…).

Oreo Turkey Cookies (3)

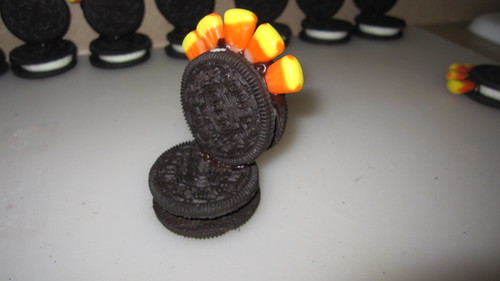
Put a dollop of chocolate frosting on the opposite edge of the Oreo from where you put the candy corn. Attach this cookie to another Oreo for a base. It is helpful to sit the cookies next to the wall as they are drying.

Oreo Turkey Cookies (6)

Oreo Turkey Cookies (4)

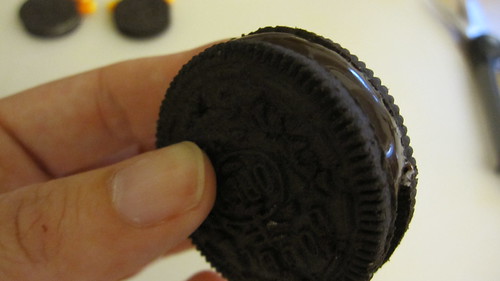
Unwrap the Reese’s Peanut Butter Cups. For some reason, I had a big problem with this and the inner wrapper kept pulling off parts of the chocolate coating. Those particular Peanut Butter Cups did not pass Quality Control and had to go into the waste disposal system (me). Cut one edge of the Reese’s Peanut Butter Cup as shown below. Use a sharp knife and this will be easy!

Oreo Turkey Cookies (8)

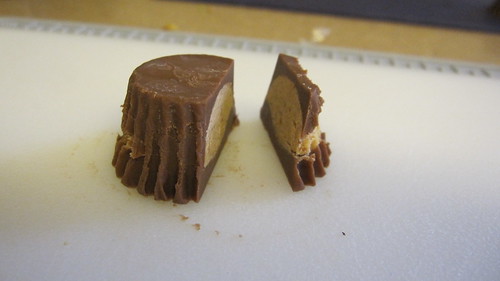
“Glue” the large portion of the Peanut Butter Cup onto the turkey back and base with chocolate frosting. I put a dollop of frosting on the cut side and the down-facing side of the Peanut Butter Cup. The small pieces cut off the Peanut Butter Cups go into the waste disposal system.

Oreo Turkey Cookies (9)

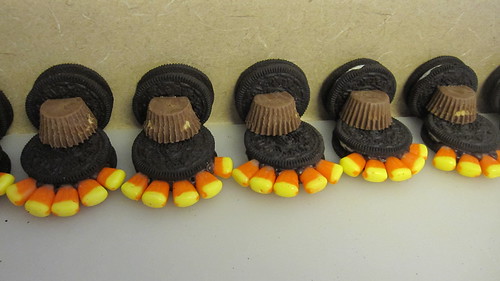
Next attach a Whopper in front of the Peanut Butter Cup (towards the Candy Corn) with chocolate frosting. Again, I put a little glob on the two edges touching Peanut Butter Cup and Oreo cookie.

Oreo Turkey Cookies (10)

While the cookies are drying, cut the white tip off 15 pieces of Candy Corn for beaks. Attach the white tips onto the Whoppers with yellow decorator icing. I made mine a little low, basically sitting against the Peanut Butter Cup. Sara at Our Best Bites (http://www.ourbestbites.com/2010/11/oreo-turkeys-and-cookie-pilgrim-hats/ put them a little higher and had room to add a red wattle under the beak. Also add yellow dots for eyes with sprinkle eyeballs (if desired). The tutorial I followed used black eyeballs, but I only had mulit-colored (no black), so I used mainly blue with a few purple and green. After the cookies dry, flip them right side up and add feet in yellow decorator icing. You can also add the red wattle, although I didn’t have room for mine except one.

Oreo Turkey Cookies (12)

Oreo Turkey Cookies (15)

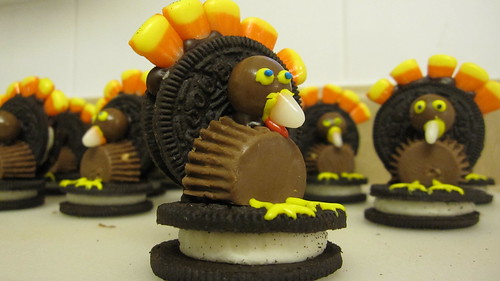
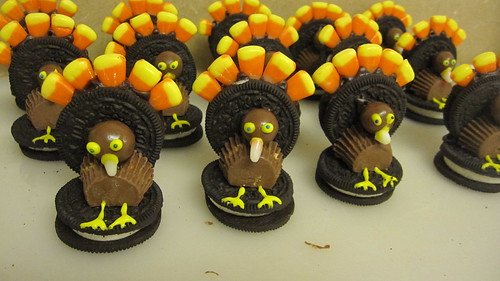
I love the way my Oreo Turkey Cookies turned out and my son is really excited to take them for his Thanksgiving feast later this week!

Source: Our Best Bites (http://www.ourbestbites.com/2010/11/oreo-turkeys-and-cookie-pilgrim-hats/)

Sunday, November 13, 2011

The Best Broccoli of Your Life!

When I first saw a picture of this recipe with the caption “The Best Broccoli of Your Life” on Pinterest I thought: “Yeah, well it is probably pretty good. Let’s give it a shot.” Now I’m a big fan of broccoli already. In fact broccoli is one of the few green vegetables (or vegetables in general) that I really like. I love it raw and I love it cooked (as long as it is not too mushy). But I am pretty lazy so I usually just steam it in the microwave and sprinkle some Slap Ya Mama Cajun seasoning or lemon pepper over it. And then I discovered this recipe. O-M-G! I have to one-up the The Amateur Gourmet who called it “The Best Broccoli of Your Life” and say that it may quite possibly be one of the best things I’ve ever put into my mouth! Top Ten at least! My husband savored it and even my 3-year-old, who usually says broccoli is “yucky” wanted more after he tasted his one small requisite bite. It was so good I wanted to cook up another batch right away.

As The Amateur Gournmet mentions, the key to getting the crispiness of the broccoli is to make sure that it is completely dry. Following this advice I opted to skip washing the broccoli. Might kill me – but it was SO worth it! I just guessed at the amount of olive oil, salt and pepper, but I did check out the measuring spoons to get an idea what that amount would look like. After neglecting to buy garlic (thought I had some already, which turned out to be scallions – oops!) I used jarred crushed garlic, 4 tsp to replace the 4 cloves. For the cheese I used KRAFT Shredded Parmesan, Romano and Asiago cheese – I can’t be bothered to grate cheese! I didn’t use the pine nuts or basil (which I bought in preparation for the recipe, but sort of forgot to put in at the last minute) but I think the pine nuts would add a great crunch to the dish.

Photo from The Amateur Gourmet


The Best Broccoli of Your Life

Ingredients
4-5 pounds of broccoli, cut into florets and dried
6-1/2 Tbsp olive oil
1-1/2 tsp kosher salt
1/2 tsp fresh ground pepper
4 garlic cloves, peeled and sliced
1 lemon
1/3 cup freshly grated Parmesan cheese
3 Tbsp toasted pine nuts
2 Tbsp julienned fresh basil

Directions
1. Pre-heat oven to 425°.

2. Put broccoli florets on a cookie sheet. Toss with 5 Tbsp olive oil, kosher salt and pepper. Toss in sliced garlic.

3. Roast in the oven for 20-25 minutes, until “crisp-tender and the tips of some of the florets are browned.”

4. Zest the lemon over the broccoli. Squeeze the lemon juice over the broccoli. Add 1-1/2 Tbsp olive oil, Parmesan cheese, pine nuts and basil. Toss to coat. Serve immediately.

Source: The Amateur Gourmet

Wednesday, November 9, 2011

Slow Cooker Jambalaya

After my first attempt at crock pot cooking I decided that it was a pretty good idea – and I probably wasn’t going to burn the house down. The next recipe up for trying was Slow Cooker Jambalaya, which I found on Pinterest (big surprise!). I couldn’t find andouille sausage at my neighborhood Walmart, so I substituted turkey sausage instead – still tasted great and less calories and fat! For my Cajun seasoning I always use Slap Ya Mama, which we discovered while living in Louisiana, but you can now get pretty much everywhere (I think). If you like a lot of rice, double the amount in the recipe or more. I doubled it and had enough for one night’s meal for two adults and two kids with a little left over. This recipe had the perfect amount of spice for me – not too much and not too little. Plus it was super easy!

Slow Cooker Jambalaya 3

Slow Cooker Jambalaya

Ingredients
1 lb skinless, boneless chicken breast, cut up into small pieces
1 lb andouille sausage, sliced
1 28oz can diced tomatoes with juice
1 large onion, chopped
1 large green bell pepper, chopped
1 cup chopped celery
1 cup chicken broth
2 tsp dried oregano
2 tsp dried parsley
2 tsp Cajun seasoning
1 tsp cayenne pepper
1/2 tsp dried thyme
1 cup instant rice

Directions
1. Place all ingredients except rice in slow cooker. Cook on low for 7-8 hours, or on high for 3-4 hours.

2. Cook rice according to package instructions. Add rice, as desired, into each individual serving of jambalaya. Store rice separately from rest of stew.

Sources: Cats and Casseroles; All Recipes

Sunday, November 6, 2011

Circle Shirt ~ Tutorial

As a mom my wardrobe consists mainly of jeans and t-shirts, most that have seen better days. For the most part these clothes are great – I mean who wants to climb up the fast food play area steps to retrieve a 1-year-old in designer clothes! But sometimes I wish I could have a few new things. Of course I am the stingiest shopper when it comes to clothes. Mostly just for MY clothes. I don’t really like to buy anything that isn’t on sale. So when I found this Circle Shirt tutorial on Pinterest I was excited to find a new look that I could make on the cheap!

.

Jenn at The Craft Patch has laid out a great tutorial for making this shirt. It was pretty easy to make, even for me and I am a sewing newbie!

A NOTE: At The Craft Patch, Jenn explains that getting a knit fabric that does not fray is especially important. She used a jersey knit fabric (t-shirt material) and left the edges raw (no hem). My plan was to use the same type of fabric, but when I was at the fabric store a red, shiny knit fabric caught my eye and I thought it would look great for the shirt. I figured it would be worth giving it a shot to try! I probably could have left the edges raw, but felt that due to the fabric that I used, the shirt would have a more finished look if I hemmed the edges.

For this project you will need:
• 1 yard 60” wide knit fabric
• Matching thread

Start with your fabric laid out folded over one time. This will basically be just laid out as it came home from the store. Good sewing etiquette says you should iron out your fabric, but if it is pretty smooth already, it isn’t overly important for this project.

Circle Shirt (1)

Round off the bottom (unfolded) edges of the fabric. I just did this free hand with my scissors, but you could also mark the fabric first if you wanted.

Circle Shirt (2)

After cutting the first corner I laid the cut-off piece on the other fabric corner as a guide to make both edges cut the same way.

Circle Shirt (3)

Circle Shirt (4)

Next cut the neck hole in the folded side of the fabric. Use an existing shirt with the general neckline you would like as your template for cutting the neck hole. I used a nice fitting tank top. Line up the top of the shirt’s neckline with the folded edge of your fabric, then cut around the neckline. As shown in the picture I cut the small (back) section of neckline through both layers of fabric. Then cut the top layer only for the front neckline. I had to estimate this as well by just looking at the neckline on my tank top.

Circle Shirt (5)

Circle Shirt (6)

Unfold your fabric and refold the other direction. This will allow you to make sure that the neck hole and curved edges are symmetrical. Trim up as needed.

Circle Shirt (7)

At this point I sewed a small hem around the neckline and entire outer edge of the shirt. I took a ¼” seam all the way around both edges (edge of shirt and neck) and then repeated, folding over the small seam. This gave the edging of my fabric a better look.

To make the armholes separate from the main shirt body, you will sew a line up each side of the fabric to fit around your body. You don’t want the lines to be too close together or the shirt will not go on (any questions as to how I figured this out?). Trust me – do not learn the hard way. :) For my second go-around, I used my tank top as a guide and made my lines 3½” out from the edge of the tank top. Fold the fabric back on the original (top) fold and lay the tank top down lined up with your cut-out neck hole. I used a seam gauge to measure out the 3½” from the edge of the tank top and marked it with a pin. I laid out the seam gauge perpendicular to the shirt edge to make my pin line curve, just like the sides of the tank top. I also marked the top (end) of my seam line with a sideways pin, about 2 inches below the armhole of the tank top.

Circle Shirt (9)

Circle Shirt (11)

Circle Shirt (13)

Circle Shirt (14)

Sew along your marked lines, removing the pins as you go. You are done! Enjoy your new shirt!

.

Sources: The Craft Patch

Wednesday, November 2, 2011

Teriyaki Salmon with Cucumber Salad

One of the healthier lifestyle changes that I would like to make is to eat more fish. This means cooking more fish, which I don’t really know many options for. I have accumulated many recipes for various seafood recipes over the years, but have actually tried very few of them. My current goal is to cook one new fish/seafood dish per week. This week’s recipe is Teriyaki Salmon with Cucumber Salad. I found the recipe on Pinterest and followed the link to the Real Simple website for the recipe.

The recipe is quick and simple with few ingredients and little prep work, all things I value in a recipe. There is plenty of time to prepare the cucumber salad, heat up the grill and make any additional side dishes while the salmon is marinating. I used pre-minced garlic (comes in a jar in your produce section), which I almost always use in recipes. In the past I always peeled and minced or crushed my own garlic, but I have found that the jarred version works just as well. I also used 3 regular cucumbers and had plenty left over, but we are not huge fans of the cucumber around here.

The ingredients list calls for skinless salmon fillet; however, the directions instruct you to first place the salmon skin-side down on the grill. I used skinless salmon fillets (mostly because the skin grosses me out) and I did have a little problem with the salmon sticking on the grill when I turned it over. Using salmon with skin on one side should help with that problem. Later, my husband told me that our grill cooks hot, so next time I will turn down the temperature a little lower. Did I mention this was my first time grilling – ever?

To round out the meal I added wild rice and edamame as additional side dishes. I love steamed edamame, which my sister introduced me to and I always get when we go out for Hibachi. I used a frozen pre-shelled version that I just heated up in the microwave and sprinkle with sea salt. Although not as good as the “real” thing, it was pretty tasty and there was no hassle with the pods.

My family enjoyed the salmon – even my picky 3-year-old – and overall this was a good, quick recipe. Plus, I learned that my 1-year-old loves cucumbers! The salmon would also be great baked instead of grilled and I think I will try that the next time. The cucumber salad could also be enhanced with the addition of carrot strips.

Teriyaki Salmon with Cucumber Salad

Teriyaki Salmon with Cucumber Salad

Ingredients
2/3 cup teriyaki sauce
1/4 cup light or brown dark sugar
1 garlic clove, minced
6 6-ounce pieces skinless salmon fillet
2 English (or 4 regular) cucumbers, thinly sliced
3 Tbsp seasoned rice (sushi) vinegar

Directions
1.  In a small bowl, whisk together the teriyaki sauce, sugar, and garlic until the sugar dissolves.
Place the salmon in a large bowl and toss with marinade to coat. Cover and refrigerate for at least 15 minutes.

2.  Toss the cucumbers with the vinegar; cover and refrigerate until ready to serve.

3.  Heat grill to medium. Remove the salmon from the marinade and arrange skin-side down on grill; cover with lid. Grill without turning, 8 minutes.

4.  Using a large spatula, carefully turn salmon and cook, covered, 2 to 3 minutes longer, just until cooked through but still moist and flaky.

5.  Serve salmon with cucumber salad.

Sources: Real Simple