Saturday, October 29, 2011

Milk Maid Hat

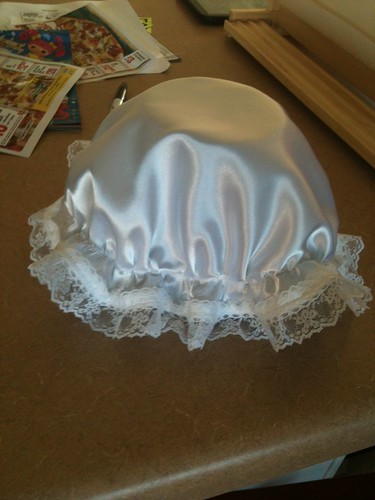
Halloween was quickly approaching. My husband wanted to go to a Halloween party and he actually wanted to dress in costume! Well – he has a cow (complete with udders) costume that he really wanted to wear for the party. Granted it was a Harley Motorcycle club party and he really wanted to wear the cow costume on his bike. Of course I wanted a matching or related costume, so I decided to go as the milk maid. I found a Dorothy Wizard of Oz outfit from Party City that would work, but I really needed the white, puffy milk maid hat to round out the outfit. So I decided to make one.

Now, this was my first project on my new sewing machine. I just got the sewing machine the week before Halloween and I was very excited to use it! I went online and found a great tutorial for making the type of hat I was looking for, which I discovered is called a Mop Hat. The best tutorial I found from Modesty Matters.

Since this was my first sewing project on my own, I was a little shy of going to the fabric store. I selected a poly satin in white because I wanted the fabric to be a little shiny to match the white fabric of the dress. I also bought some lace for the trim and I already had some thin elastic (maybe 1/4" wide) that I had used in another project. I wasn’t thinking about blogging my creations at this time, so I didn’t take pictures while I was working. Check out the tutorial for great demonstrations of the general technique.

The only thing I really did differently than the tutorial video was that my hat was quite a bit smaller than their hat. I wanted a smaller, cuter brim of the hat, where theirs is more floppy. I also added a trim of lace along the edging of the hat. I did this after hemming the edges of the hat and before sewing in the elastic. I was pretty proud of my first sewing project.

Milk Maid Hat 10-29-11

Wednesday, October 19, 2011

Crockpot Lime Chicken Tacos

Confession: I have never cooked a meal in a crock pot – until today. Seriously. I have owned a crock pot and I have used it for heating dips or soups at pot-lucks or parties. But I have never actually cooked a “meat included, veggies included, ALL INCLUDED” meal in a crock pot – until today.

I have been wanting to try it out for awhile now. First was all the hype with the Crock Pot Girls on FaceBook, which I “liked” but never actually tried any recipes. Then I started getting into Pinterest and saw lots of yummy looking crock pot recipes. So I finally decided to try one. Before taking the kids to school in the morning, I loaded the crock pot with the recipe ingredients and then I got nervous! I was worried about leaving the crock pot on while I was gone all day. All my FB friends promptly assured me that it would be fine, not burn the house down, and that I was crazy for not trying crock pot recipes sooner! I actually forgot about the meal while I was out running errands during the day. When I came home I first couldn’t figure out what the wonderful smell was – it was my crock pot happily cooking away! A super quick, easy and delicious meal was awaiting my family.

So the first recipe I made in the crock pot was Lime Chicken Tacos from Taste of Home. I found the recipe via Pinterest – duh. I was amazed at how easy it was to shred the chicken after it had been cooking all day. I also cut fresh lime wedges and sprinkled the fresh lime juice over the tacos for a little extra zing. The tacos were definitely a hit with the family and a hit with mom! The recipe was super easy and delicious!


Lime Chicken Tacos

Ingredients
1-1/2 pounds boneless skinless chicken breasts
3 Tbsp lime juice
1 Tbsp chili powder
1 cup frozen corn
1 cup chunky salsa
12 flour tortillas (6 inches), warmed
Sour cream, shredded cheddar cheese and shredded lettuce, optional

Directions

1.  Place the chicken in a 3-qt. slow cooker. Combine lime juice and chili powder; pour over chicken. Cover and cook on low for 5-6 hours or until chicken is tender.

2.  Remove chicken; cool slightly. Shred meat with two forks and return to the slow cooker; heat through. Stir in corn and salsa.
 
3.  Cover and cook on low for 30 minutes or until heated through. Serve in tortillas with sour cream, cheese and lettuce if desired.

Source: Taste of Home

Sunday, October 16, 2011

Build-A-Snowflake ~ Busy Bag Activity

My first Busy Bag creation was the Build-A-Snowflake activity, which I discovered in Money Saving Mom’s blog post Busy Bag Idea: Felt Snowflakes. Your child chooses a card showing a picture of a snowflake and builds the snowflake with felt pieces. If they choose a question mark card, they can create a snowflake of their own. This simple activity promotes shape and pattern recognition and also encourages creativity.

Build-A-Snowflake 4

Items Needed:
White felt
Dark Blue or Other Dark Color Felt
Cardboard
FREE Printable Patterns
Scissors
Glue
Laminating Materials (optional)

How To:
Print out the FREE patterns at Making Learning Fun. Cut out the snowflake cards and snowflake pattern pieces. Trace the snowflake pattern pieces onto the white felt, then cut out. There is only one of each snowflake piece pattern (i.e. square, circle, etc.), but you will need to cut multiple shapes of each type as shown in the picture below:

Build-A-Snowflake 7

To make the snowflake cards more durable, I opted to laminate them. I use a small personal laminating machine, the Scotch™ Thermal Laminator TL-901, which I picked up at Target for about $25. Click here for more on laminating options, tips and photos. (POST LINK)

Build-A-Snowflake 5

For the playing board, I cut an 8” square from cardboard and covered it with dark blue felt using hot glue. I only glued on the back side of the board so that there wouldn’t be any bumpy areas on the front. I pulled the felt tight and glued the edge to the back side of the cardboard square. For the corners, I cut the felt at an angle so that there was only one layer of felt on the corners.

Build-A-Snowflake 2

Build-A-Snowflake 3

A quart-size Zip-Lock bag works great for storing all the parts and has a handy spot for labeling.

Build-A-Snowflake 1

Resources:
Money Saving Mom – Busy Bag Idea: Felt Snowflakes
My Little Alberta Family – Snowflake Activity – Detailed instructions with pictures
Making Learning Fun – Visual Discrimination Snowflake Activity – FREE Printable Pattern

Saturday, October 15, 2011

The Busy Bag ~ What, Why and How


While browsing around on Pinterest, I became aware of the phenomenon known as the “Busy Bag.”For those who are new to the concept (as I was), a Busy Bag is basically a bag or box filled with small activities to keep your toddler or young child quietly entertained on their own. For me, the two most important concepts of the Busy Bag are 1) QUIETLY and 2) ON THEIR OWN. Now, granted, a Busy Bag activity is not going to buy you enough time to fully clean the house or catch up on your reality TV shows (you know you have them on the DVR), but it might allow you to start dinner, unload the dishwasher or at least finish reading this blog post with some degree of sanity.

After fully embracing the concept of the Busy Bag and deciding that I need loads and loads of such activities, I quickly went to work searching the web, finding ideas on Pinterest and thinking about all the great Busy Bag activities I wanted to make. There are a lot of online resources for Busy Bag ideas; here are a few that I found particularly helpful.

Money Saving Mom – Lots of Busy Bag ideas

My Delicious Ambiguity – Sample Busy Bag and tons of ideas for Busy Bag activities

Unsolicited Advice – Busy Bag Swap and lots of Busy Bag activity ideas

PreKinders – Fine motor skill activities that could be used for a Busy Bag

Monkey Butt Junction – Several Busy Bag ideas and links to even more

Eventually I came to realize that it wasn’t enough to just PLAN all the Busy Bag activities, but I actually needed to MAKE some! I hit up the local Walmart (store of choice in my family) to pick up some supplies. Most of the Busy Bag ideas are simple designs and do not cost much to make. Since I had less than a plan, I picked up a couple packs of variety felt, pipe cleaners, craft pom-pom balls, clothespins, and any other craft supplies that looked fun or useful. During my first Busy Bag project, I also added a personal laminating machine (link to post) to my stash of “necessary tools” (i.e. fun toys). Laminating any paper parts of your Busy Bag activities will make them last much longer in little toddler hands. You will also find that many Busy Bag activities can be created with the items you already have laying around the house.

Finally I got to work creating my very first Busy Bag - Build-A-Snowflake. I can’t wait to use all the great resources I’ve discovered to create hours of fun for my kids – and sanity for me!

Monday, October 10, 2011

My Life Re-Created ~ The Beginning


I have always wanted to be a stay-at-home mom. My mom stayed home with me and my sisters and I wanted to be able to share that time with my children too. I remember in college when I was interviewing for an internship with a Big Four accounting firm, one of the interview questions was: “Where do you see yourself in ten year?” I assume the answer they were expecting was something along the lines of “Senior Manager in the firm and heading towards being a Partner” or “CEO of my own company” or something else along those lines. My answer was “At home, raising my children.” That was what I truly wanted and truly believed I should do with my life. (P.S. I still got the job.) Random story just to illustrate that even while pursuing the beginning of my first career I was always planning and thinking of the day when I would begin my second, and most important career, as a mom.

Sometime after my second son was born I began to feel that I was not living up to my potential in this second career. I mean, I never thought I would be “that mom” that always did everything perfectly, made crafts with her kids and made special lunches every day! But I felt like I was spending all of my time refereeing the kids instead of enjoying them (and they were only 3 and 1). And I’m pretty sure they weren’t enjoying me much either! I knew I needed to make a change and began looking online for activities to share with them, projects and snacks to make, and ways to get organized and have better stay-at-home times. Of course I found tons of great ideas on the Internet, from activities and projects to meal ideas and recipes. Many of these ideas were simple and easy to implement. Others were more time consuming and involved a higher level of what I’ll call “craftiness.”

Now, I’ve never considered myself a crafty or creative person – I don’t have a lot of “craftiness.” When I was growing up my mom did lots of craft projects, mostly cross-stitch, plastic canvas, etc. I did my fair share of those types of projects too. I even made some things on the sewing machine with my mom. But I’ve never been what I think of as creative – that is someone who can form their own idea, find inspiration in everyday things and then take that inspiration and make it a reality. However I can imitate a picture and follow directions, which are really the main tools you need for craftiness these days! There are so many online tutorials and Do-It-Yourself projects out there with step-by-step directions (including illustrations) that anyone can get discover their inner “craftiness.”

So I began to take on some projects, just a few at first with lots more in my mind. As I began exploring, I came across more and more ideas and types of things I wanted to try. I bought a sewing machine and experimented with making clothes and things for the boys, dabbled in home improvement, organization and decorative projects and spent lots of time in the kitchen trying out new recipes and meal ideas.

As I travelled along this road of “craftiness,” I wanted to keep a record of the projects I attempted, the things I made, even the failures along the way. And so this blog was born. My Life Re-Created chronicles my “re-creative” process of finding ideas (crafts, recipes, activities, etc.) and re-creating them for myself. And along the way I will also re-create the person, the parent, the mother, that I am. I hope that by writing this blog I can inspire someone else to spend a little more time enjoying their children, discovering their “craftiness,” or possibly even finding a little encouragement. Welcome along for the ride!